Showing posts with label homemade. Show all posts

Monday, April 16, 2012

Homemade Spinach Breakfast Burritos

It never fails. I get in the car after a long night at work and turn on the radio to keep from falling asleep. McDonald's or Subway, is always there to try to sway me to part with the money I just worked so hard to make. I try to tell myself that it's unhealthy, I don't need to spend the money, or that it won't taste that good. MOST of the time I win. But, I admit, sometimes in a moment of weakness I find the car making its way through the driveway. Almost as if it has a mind of its own. I honestly don't know how it gets there. But it does, and by the time I'm halfway home I'm already regretting the $7 down the drain and the extra 1,000 calories that I DID NOT NEED!

It would be so much easier to resist it if I knew I had something quick and easy to eat when I get home. Yeah, I could buy a bag of frozen breakfast burritos or egg sandwiches, but this is way cheaper. And tastes better. And I know what is in it!

Now, I did cheat a little with this. I'm a little ashamed that I didn't put the time and effort into chopping fresh peppers, onions, and potatoes, but since peppers are out of season right now it was cheaper to buy the bag of frozen peppers. I thought it was worth the time saved for the potatoes too. I did get the spinach out of my garden though!


Homemade Spinach Breakfast Burritos
Ingredients:

16 Burrito sized tortilla shells
2 lbs browned sausage
2 dozen eggs
4 cups of diced peppers and onions, sauteed
2 lbs of diced potatoes or hash browns
12 oz Sharp Cheddar Cheese
Fresh Baby Spinach

Combine cooked sausage, potatoes, peppers and onions in a large bowl. Scramble eggs, then add to sausage mixture. Add the spinach and cheese, mix thoroughly. Spoon into tortilla shells and fold like a burrito. Place flat in gallon sized ziplock bags and freeze. Makes 16-17 burritos. 

Note: Don't forget to season the potatoes (salt, pepper, etc.) as you cook them. I forgot to, and it was difficult seasoning the entire mixture!


Not very pretty, but really tasty!


Fresh spinach adds a nutritious touch!


Frugal Days, Sustainable Ways #23

FarmGirl Fridays

Tuesday, November 15, 2011

Homemade Laundry Detergent


One simple way to save money is by not buying laundry detergent. No, I don't mean to stop doing laundry, (although that does sound enticing) but to make your own laundry detergent! There are pages upon pages of different recipes for homemade laundry detergent on the internet. I chose to use a powder detergent because it was easier to make than the liquid. I find it is easier to store than the liquid detergent also. I found this recipe at DIY Natural. They have a cost analysis on their website that breaks the cost per load down to $0.05!


This saved a lot of time and effort!
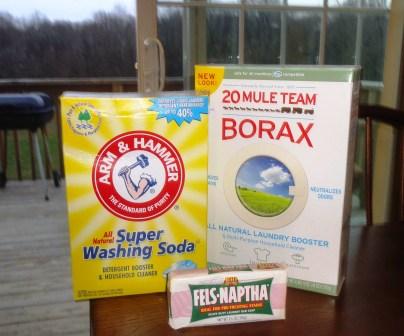
It is a very simple recipe, and it only requires three ingredients. Bar laundry soap (such as Fels Naptha), Arm and Hammer Super Washing Soda, and Borax. For one batch you will need the following,

1 bar shaved laundry soap
1 cup A&H Super Washing Soda
1 cup 20 Mule Team Borax

Mix together and you're done! Use one tablespoon per load, or 2 for heavily soiled loads.


 Tips

-  I used an electric grater (Salad Shooter) and it was a lot easier to grate than doing it by hand. If you are using a hand grater, and find that the pieces of soap are too big, let them dry,then process them further into a powder using a food processor.

-  If you are willing to take the time and prefer a liquid detergent, you can also go one step further and add essential oils to add a fresh scent to your laundry.

-More recipes (including liquid recipes) can be found at tipnut.com

Friday, November 4, 2011

Chocolate Covered Coffee Beans

Since I have already exposed myself as a hardcore coffee drinker, here is another one of my weaknesses...

Chocolate Covered Coffee Beans

These things are AMAZING. I first had some when my parents brought a baggie home from their vacation. I was extremely hesitant. Who wants to eat a bitter, roasted coffee bean? Well was I in for a surprise! They are now probably my favorite piece of chocolate.

The only problem is, they are very pricey. Which means I have only had a handful since I discovered the wonderful combination. Until this week.

For some reason, it had never crossed my mind to make my own, until my sister made me try a spoonful of coffee grounds and chocolate chips. (crazy, I know, but I had my eyes closed) Then it was like a light bulb went off above my head! Why not make my own?!? Honestly, the grounds and chocolate chips tasted just like what we bought at the store. (ok, may not that good, but close enough)  Sooo, I set to work with a bag of dark chocolate chips and a bag of hazelnut flavored coffee beans.

To make your own you need your favorite type of chocolate and whole coffee beans. This time, I used dark chocolate, but I would like to try milk chocolate the next time I make them. 

Some people like to roast the coffee beans before coating them. Personally, I just used them right out of the bag. I like the crunchiness of them and the texture. If you want to roast them first, put them in a preheated oven at 350F for 8-10 minutes.

First of all, you need a double boiler or a saucepan and a glass bowl to melt the chocolate in. Once the chocolate is melted, add the coffee beans. Mix them around until they are thoroughly coated with chocolate. Other directions say to use a slotted spoon to let the excess chocolate to drip off. But... we're newlyweds and our kitchen isn't completely stocked with utensils yet. So, I used plastic knives to pick them out of the bowl. It works either way!

If they have an excessive amount of chocolate on them still, (not a bad thing, especially if you're not particularly fond of the coffee beans) try to get them into the freezer as soon as possible to prevent the chocolate from melting into a puddle around the bean.

And there you have it! Homemade Chocolate Covered Coffee Beans, at a fraction of the cost. I have a feeling these will make great homemade gifts for those that are crazy about coffee, combined with a cute coffee mug!

Wednesday, October 26, 2011

Pumpkin Pie Coffee Creamer

I am a coffee addict. I admit it. In an average week, I go through about two 32 oz bottles of store-bought liquid creamer. I switch the flavors around. One week I have Almond Joy and Cinnabon, the next it may be White Chocolate and Raspberry. Sometimes I'll go back to the plain 'ol hazlenut or french vanilla, but most of the time I experiment with new flavors. Now, in  my defense, staying up until 7am isn't the easiest without a caffeine boost, and hey, why not make it tasty in the process, right?

Well, the other day I was blog surfing (don't know if it's an actual term, but it works) and I came across a recipe for Pumpkin Pie Coffee Creamer at Homemaking on the Homestead! (Lots of good pumpkin recipes there too!) I have been scouring the local stores for this with no luck, for the last month! So, I gathered the ingredients and made some this afternoon. I wasn't quite sure how it would turn out, so I only made one batch at first. After testing it out with my cappuccino maker (makes some AWESOME froth!) it was a hit! I went ahead and made creamer out of the whole 32 oz of half & half that I bought. I'll easily go through it all in the 7-10 day lifespan, especially after sharing my success with my co-workers!

After realizing how awesome this creamer was, I started to wonder what else am I missing out in the world of homemade creamers? Really, if I can make it at home with REAL ingredients I'd much rather do that than look at the list on the store bought bottle and have no idea what's even in it! So I googled it! I now have an entire list of homemade creamers, that sound awesome! And I will share them with you as I try them out at home :)

So, here is the first one...


Pumpkin Pie Coffee Creamer

·         1 cup half-n-half
·         ½ cup cane juice crystals (can use white sugar instead)
·         3T canned pumpkin
·         ½ t vanilla
·         ½ t cinnamon
·         ¼ t ginger
·         1/8 t nutmeg
·         1/8 t cloves

Combine all ingredients in a small sauce pan. Heat until cane juice crystals or sugar is dissolved and ingredients are well combined. Enjoy in a hot cup of coffee. Store in refrigerator for 7-10 days.


Do you have anything that you can make better at home than store-bought? Share it! I'd love to hear about it in the comment section below :)

Thursday, October 13, 2011

Spinach and Cabbage Minestrone Soup

I love making soups. What I like doing even more than making soup, is making my OWN recipe for it! Well, yesterday I had a recipe DH wanted me to try out. I got a little distracted and made it my own ;) It ended up turning out pretty good though. DH really liked it and so did I. Since it was, "a little of this, and a little of that" the recipe isn't exact, but you can figure it out!

Spinach and Cabbage Minestrone Soup

6 cups beef broth (I didn't have any on hand so I used more seasonings and water)
1 lb ground beef
2 small onions, quartered and sliced
1 clove garlic, minced
1 can diced tomatoes
1 cup shredded cabbage
1 cup spinach
1 can kidney beans
1 cup cooked macaroni noodles
 1/2 cup sliced carrots
Italian seasoning to taste
Onion powder to taste
Garlic salt to taste

In a pot, brown the ground beef until cooked. Drain grease. Add onions, garlic, carrots, and cabbage. Saute until onions are translucent. Add the broth, tomatoes, kidney beans, and spinach. Add seasonings to taste. Let simmer. About 30 min before serving, add the macaroni. Remember, it's not exact so experiment and make it your own :) Enjoy!


Tuesday, October 11, 2011

Homemade Vanilla Extract

Earlier this year I made homemade vanilla extract. I couldn't believe how easy it was, and how much cheaper it is to make than to buy it at the store! All you need are a couple ingredients and some bottles to store it in. It also makes an excellent gift!


Homemade Vanilla Extract
2 cups vodka, rum or brandy
6 vanilla beans

Cut the vanilla beans longways all the way up until about 1" before the end. You don't want to cut the entire bean because it will fall apart. In tall bottles, put 2-3 beans in and fill to the top with your choice of liqueur. Let sit for about 2 months for the vanilla to infuse into the alcohol. Since you leave the vanilla beans in the bottle, when your bottles get low just refill with more alcohol. Some people like to strain it before use, but personally I like the little specks of bean that is left in it.


Finding the Vanilla Beans
E-Bay is a great place to find food-grade vanilla beans. I got mine from this this seller on ebay and had no problems. Sometimes small specialty stores have vanilla beans for sale locally, too. It just takes some searching.

Do you have something you like to make homemade instead of buying? Let me know in the comment section! I'd love to hear your ideas!