Okay, okay, you caught me. I know I haven't had a post in a little over a week now. My home has been plagued with some type of stomach bug that ended up requiring both my husband and I calling in sick to work. Oh, and did I mention this week is finals week? Yeah, it's been that kind of week. *sigh* I really don't know about you guys, but is it difficult to get in the *Christmas Spirit* when all you can think about is housework, homework, work-outside-of-work work, and the never-ending farm work?
It's one thing when you are healthy, but when something like that hits you and leaves you asleep for two days without batting an eyelash, things tend to pile up!
(Yes, I know all of you moms out there are thinking, "There's no way I could sleep for two days straight with the kids! I know, one day I won't have the luxury of sleeping when I'm sick so I'm gonna enjoy it while I can ;)
So, my random thought this week has been that I really need to appreciate my health more than I do!
On a side note, DH and I are planning on making our homemade jar gifts tomorrow! So plenty of pictures and directions are coming. (Yeah I know, were cutting it pretty close! Especially considering Christmas is only 9 days away!)
Have a good Friday! :)
Are there any "homesteading" students out there? I don't know about you but I am soo ready for winter break. What about you? Any plans?

Friday, December 16, 2011
Sunday, December 4, 2011
Horseback Riding Safety
Did you know that most riding accidents do not occur during “dangerous” sports, but while riding for pleasure? And that the most common reason for admission to the hospital among horseback riders is due to a head injury?
A few weeks ago, my 14 year old sister went to the emergency room and ended up staying overnight because she was not wearing her helmet while riding her horse. She was fine at first, but after a little while we could tell that she was not ok. She ended up with a concussion and some short-term memory loss. She could not remember at all what had happened over the last week, and continuously asked the same questions within minutes.
After a 24 hour stay at the hospital for observation she was fine, and she is back to her normal self. But it was a reminder that we always need to wear our helmets while riding, even if it is just a quick ride down the road.
I am sharing this because many homesteaders dream of having a horse on their farm for pleasure and for work. While I know that wearing a helmet may not be the rough and tumble vision of homesteading you had in mind, it is a very important aspect of owning and riding a horse. English riders shouldn’t be the only ones willing to protect their brain! Fortunately, this trend has been changing (albeit slowly) in recent years due to the increased public knowledge of the protection offered by helmets.
Choosing a helmet
First of all, never substitute an ASTM approved and SEI certified helmet with a bicycle helmet! The coverage area that a bicycle helmet protects is very different from the areas most commonly injured in horse riding accidents. Riding helmets extend further down the back of the head to protect this very sensitive area of the head. Bicycle helmets are also not as rigorously tested and do not go through the same certification processes as riding helmets.
There are so many choices for helmets nowadays. It really boils down to how much you want to spend and if you are concerned about style. I have bought many helmets over the years and have found that you get what you pay for. I’m not saying that you have to go out and spend $200 on a helmet, just that cheapest is not always the best route. The cheaper ones I have bought tend to fall apart easier, especially after spending the year in a hot barn.
A good, cheap helmet that isn’t going to fall apart after one summer would be the Troxel Sport Schooling Helmet. It's not pretty, but it's only around $25 and has most of the comfort features of Troxel's more expensive models.
After that, basically the sky is the limit as far as how much to spend, but an average range priced helmet that I like is the Troxel Legacy Helmet. What I like most about this helmet, is that it has a fixed visor. Velcro attached visors tend to fall off after a while, so I am willing to splurge for one that isn't going to fall to the ground if I want to go for a gallop.
 |
When to get a new helmet
As long as you take good care of your helmet, it should last you a good while. It is recommended to replace your helmet every five years, but if you are involved in an accident while wearing it you will want to replace it immediately. The foam inside the helmet will basically collapse when it protects your head in a fall. Troxel also has an accident replacement program, although I am not certain on what their fee is to replace the helmet.
So, remember Every Time, Every Ride and you should be well on your way to keeping your head safe while riding!
This post is linked to the Living Well Blog Hop at Common Sense Homesteading,& Homestead Revival Barn Hop #39
This post is linked to the Living Well Blog Hop at Common Sense Homesteading,& Homestead Revival Barn Hop #39
I have not been paid or reimbursed for anything in the writing this article. Simply a satisfied customer.
Websites used
http://www.riding-instructor.com/helmets.php
http://www.troxelhelmets.com/blog/troxel/know-when-its-time-to-replace-your-riding-helmet
Sunday, November 27, 2011
Winter Vehicle Emergency Kit
Picture this. You are driving your car, either by yourself or with your children. It's cold, dark, and there are several inches of snow on the ground. The road is slick. Suddenly you realize you're going too fast and before you know it you're stuck in the ditch.
 |
| Credit: Free images from acobox.com |
You begin to realize you are going to be there for a while and need something to keep you and the kids warm, but nothing is to be found. Then, the kids begin whining because they are hungry and scared. What do you do?
Well in this situation, there's not much to do but comfort the children and hope and pray that someone stops for you. But since we're not really in this position we can prevent it before it happens. This is why it is important to make sure you have the necessities for winter driving.
So, what can we keep in the car that would help in this situation? First of all we have several main things we need to focus on. These are warmth, visibility, food and water. Let's start out with warmth, our most important factor in cold weather.
Warmth
I always keep a heavy blanket for each person in my truck because of the described scenario above. Also, I include several emergency blankets in my truck. They are small and light, so it makes it easy to keep a few on hand, just in case. In addition, I keep enough hand and body warmers for each person. If it is below freezing, these could prevent losing finger or toes due to frostbite.
In addition to these, keep a few good pairs of gloves and scarves in the car too. These will come in handy if you need to go out and change a tire, etc.
Visibility
Next on on our list is visibility. The first thing I would want would be a reflective triangle to place on the road. This will get people's attention, and possibly get you out of there sooner. It can also help if you are stuck on the road by preventing you from getting rear-ended, etc. due to low visibility.
Always keep a couple flashlights in the car. My opinion is that you can never have too many! Another great item to have on hand is a headlamp. These are invaluable while changing a tire ;)
For the kiddos, glow sticks are a great way to calm them down and give them something to play with.
Food and Water
This is an area where you will have to take into account what you and your kids like to eat. Personally, I keep a box of Clif bars in my truck. I like to eat them, and they're not messy. Try to keep something that is not too salty or sweet so you aren't even more thirsty. (Bathroom trips in the snow aren't fun ;)
If this was to turn into something longer than a several hour ordeal, then we would need something more than just granola bars however. Merchants on Amazon.com sell emergency food bars that contain several thousand calories that are meant for these types of emergencies. I have never tried them, but if space is limited these may be a good option for you.
For water, I normally keep a 24-pack of bottled water with me. I drink them at work, so they get rotated frequently. If you don't a lot of room, a couple 2-liter bottles could easily fit under the passenger seat or in the trunk.
This is intended to be in addition to an already well rounded vehicle emergency kit. I hope to post soon on what to keep in your vehicle year round.
Did I forget anything? What do you keep in your vehicle in the winter? Let me know in the comment section below! :)
This blog post is linked to Homestead Revival Preparedness Challenge #30 , Homestead Revival Barn Hop #38, Frugal Days, Sustainable Ways ,Teach Me Tuesdays, It's A Keeper Thursday, and Simple Lives Thursday.
Wednesday, November 23, 2011
I Am Thankful For...
What am I thankful for? That is something that we don't think a lot about through the rest of the year. Sometimes life can become overwhelming and we only think of the problems in our lives (well, I do anyway) instead of everything we have to be thankful for. So, here are my top five things I am thankful for.
1. My Lord and Savior Jesus Christ. Without Him I am nothing. He gives me strength to continue through hard times and rejoices with me in good ones.
2. My Husband. I am thankful for God putting the one man on earth that could put up with me, in my life ;) I am thankful that he listens quietly when I am confused about a decision I need to make (which has been happening a lot here lately) and he listens to me blow off steam after a night at work. (two whole hours yesterday morning....) Most of all I am thankful that he is my best friend and always by my side.
3. My Family. I am very close to my family, and I could not imagine life without any of them.
4. Our Jobs. In these hard economic times, even an imperfect job is something to be thankful for. I am thankful that I have a job that provides excellent benefits and my husband has a job that he enjoys and pays the bills.
5. The opportunity to homestead. Although I may not be as far in my homesteading journey as I would like to be, it is simply that. It's a journey. I need to take the time to enjoy it more than I do now.
Your turn! What are some things you are thankful for?
Thursday, November 17, 2011
Gulliver's Corn
With Thanksgiving approaching fast, I would like to share my absolute favorite holiday side dish. It is called Gulliver's Corn. Until I wrote this post, I didn't know where the name or recipe came from. I simply knew that everyone loved it and it's a holiday staple in our family. After some research though, I found that this recipe is from a restaurant called "Gulliver's" in Los Angeles. The story is that the LA Times coerced some restaurant employees to give up the recipe. I don't know if it is true or not, but I do know that this stuff is delicious!
Be warned, it is choc full of fat, but what holiday food isn't?
Gulliver's Corn
Be warned, it is choc full of fat, but what holiday food isn't?
Gulliver's Corn
Ingredients
- 2 (20 ounce) packages frozen corn kernels, thawed
- 1 cup whipping cream
- 1 cup milk
- 1/2 cup freshly grated Parmesan cheese
- 1 teaspoon salt
- 2 tablespoons sugar
- 2 tablespoons flour
- 2 tablespoons butter, melted
Directions
- Place corn kernels, whipping cream, milk, salt, and sugar, in a large stockpot. Bring to a slow, low boil beginning on medium heat, stirring frequently. Simmer for 5 minutes on low heat.
- Melt butter in the microwave, or in a small saucepan on low heat. Whisk in flour until smooth. Stir into the corn until well blended.
- Top with Parmesan cheese and cook under broiler until browned. Enjoy!
New Blog Hops!
This week I joined a couple new blog hops and I thought I would share them. The first one is My Simple Country Living's Homemade Gifts from the Heart blog hop. It is
a collection of all of our homemade gifts for the holidays! I don't
know about you, but I can ever get enough ideas for homemade gifts :)

The second one I joined is Frugal Days, Sustainable Ways. Join Frugally Sustainable every Wednesday and share your frugal ideas!
Have Fun!

The second one I joined is Frugal Days, Sustainable Ways. Join Frugally Sustainable every Wednesday and share your frugal ideas!
Have Fun!
Tuesday, November 15, 2011
Homemade Laundry Detergent
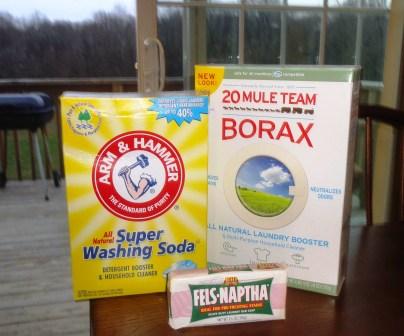
One simple way to save money is by not buying laundry detergent. No, I don't mean to stop doing laundry, (although that does sound enticing) but to make your own laundry detergent! There are pages upon pages of different recipes for homemade laundry detergent on the internet. I chose to use a powder detergent because it was easier to make than the liquid. I find it is easier to store than the liquid detergent also. I found this recipe at DIY Natural. They have a cost analysis on their website that breaks the cost per load down to $0.05!
 |
| This saved a lot of time and effort! |
1 bar shaved laundry soap
1 cup A&H Super Washing Soda
1 cup 20 Mule Team Borax
Mix together and you're done! Use one tablespoon per load, or 2 for heavily soiled loads.
Tips
- If you are willing to take the time and prefer a liquid detergent, you can also go one step further and add essential oils to add a fresh scent to your laundry.
-More recipes (including liquid recipes) can be found at tipnut.com
Friday, November 11, 2011
Building Your Homestead on a Dime
Building up a homestead takes a lot of time and work. It can also take a lot of money. If you have ever looked through a farm supply catalog, you know what I mean. We have lived on our homestead for seven years now, and before we lived here we were on another piece of property for another seven years. We still don't have everything we would like to have. But we do have everything we need.
There is a way of getting around the high prices at the feed store. It involves a lot of time, and you may not get what you need right away, but the savings pay off in the end.
 Craigslist.org
Craigslist is where I find the majority of farm items I need. You can find people near you that may be trying to sell the very item you have been looking for. While everything is not in mint condition, you may find a bargain. For several years I have been trying to find a good horse round bale feeder. They run around $400 new at the feed store. I found one on craigslist for $200. Then, when I got there I talked them down to $150. That is a huge savings! It isn't brand new, but it works for what I need.
Don't stop at the housewares or farm and garden sections though! Make sure you check out the antiques and barter categories. Put up a list of items you would like and items you have to trade. Another man's trash is another man's treasure!
The Local Newspaper
This is a good place to find deals too. I haven't had as much luck with this as I have with craigslist, but it's always worth a quick glance.
County Based Websites
Everyone may not be so lucky to have one in their county, but if you do, take advantage of it! My husband and I found a great kitchen table and china hutch for our house through our county website.
Estate Auctions and Auction Houses
This is a great place to find anything you are looking for, but unfortunately is the most time consuming of all the methods. Be ready to spend the whole day waiting for the item you are looking at to go up for sale. If you are patient enough though, you can find anything from housewares to farm equipment. A great website to find auctions near you is auctionzip.com.
Tips
-Always carry cash, and in different amounts. You know that round bale feeder? I ended up paying $160 because I only had $20 bills on me.
-Have a list of items you are looking for and the condition you want the item in. This is especially helpful for auctions.
-Know the value of what you are looking for. Don't end up being the guy that just bid 2X what the item is worth.
-Be comfortable talking people down on a price. Unless the ad says they won't take any less than the said price, it's probably expected. When I post an item, I always make sure to price it a little high because I know someone will try to talk me down. Others say not to, but in my opinion it never hurts to ask.
-Network. Get to know people nearby that may be able to help you find what you are looking for.
-Be safe. A lot of people say not to go to a seller's home. This is good advice, but unfortunately most of the time I can't avoid it because many items are too large to have the seller meet me in town. Make sure someone knows where you are going and when you'll be back. It's even better if you can take someone with you. Most of the time though, the people I meet are great people. I even got a tour of the last person's farm. (They had some adorable Scottish Highland Cattle ;)
Do you have any favorite websites for farm purchases? I'd love to hear it!
This post is linked to:
Barn Hop 66
There is a way of getting around the high prices at the feed store. It involves a lot of time, and you may not get what you need right away, but the savings pay off in the end.
Craigslist is where I find the majority of farm items I need. You can find people near you that may be trying to sell the very item you have been looking for. While everything is not in mint condition, you may find a bargain. For several years I have been trying to find a good horse round bale feeder. They run around $400 new at the feed store. I found one on craigslist for $200. Then, when I got there I talked them down to $150. That is a huge savings! It isn't brand new, but it works for what I need.
Don't stop at the housewares or farm and garden sections though! Make sure you check out the antiques and barter categories. Put up a list of items you would like and items you have to trade. Another man's trash is another man's treasure!
The Local Newspaper
This is a good place to find deals too. I haven't had as much luck with this as I have with craigslist, but it's always worth a quick glance.
County Based Websites
Everyone may not be so lucky to have one in their county, but if you do, take advantage of it! My husband and I found a great kitchen table and china hutch for our house through our county website.
Estate Auctions and Auction Houses
This is a great place to find anything you are looking for, but unfortunately is the most time consuming of all the methods. Be ready to spend the whole day waiting for the item you are looking at to go up for sale. If you are patient enough though, you can find anything from housewares to farm equipment. A great website to find auctions near you is auctionzip.com.
Tips
-Always carry cash, and in different amounts. You know that round bale feeder? I ended up paying $160 because I only had $20 bills on me.
-Have a list of items you are looking for and the condition you want the item in. This is especially helpful for auctions.
-Know the value of what you are looking for. Don't end up being the guy that just bid 2X what the item is worth.
-Be comfortable talking people down on a price. Unless the ad says they won't take any less than the said price, it's probably expected. When I post an item, I always make sure to price it a little high because I know someone will try to talk me down. Others say not to, but in my opinion it never hurts to ask.
-Network. Get to know people nearby that may be able to help you find what you are looking for.
-Be safe. A lot of people say not to go to a seller's home. This is good advice, but unfortunately most of the time I can't avoid it because many items are too large to have the seller meet me in town. Make sure someone knows where you are going and when you'll be back. It's even better if you can take someone with you. Most of the time though, the people I meet are great people. I even got a tour of the last person's farm. (They had some adorable Scottish Highland Cattle ;)
Do you have any favorite websites for farm purchases? I'd love to hear it!
This post is linked to:
Barn Hop 66
Thursday, November 10, 2011
Regrets
This morning I was talking to a friend of mine. He is going through extensive radiation and chemotherapy for cancer.
Normally we spend a while catching up on how the Colts are playing, or how our families are doing. This morning we had a little deeper conversation and I would like to share it. It has touched me personally to change how I look at things and behave.
He said that like everyone, he has things in his life that he wishes he could change and regrets some things he has done. As I was listening to his words, I didn't expect to hear the next thing he said.
He told me, that the things that he really regrets are the times God asked him to do something for Him and he didn't do it. He went on to say, things we think about in this life aren't really that important. What is really important is what the Lord will say when we stand before him and are accountable for everything we did, and didn't do.
I know personally there have been times where I know that I should have spoken up and said something to another person about the unconditional love of God, but I was too afraid. Too scared of what they may say back. Too scared of what they might think about me.
So, this conversation has challenged me. It has challenged me to do as the Lord says. Whether it be to sit down and have more Bible studies, to speak up when it feels uncomfortable, or whatever He has in store for my life.
I know I will have regrets when I am nearing the end of my life, but if I listen to the words of a dying man I can reduce the heartache I will feel when that time comes.
 |
| Credit: Free photos from acobox.com |
Sunday, November 6, 2011
Melatonin, A Natural Sleep Aid
I know this may be a bit ironic to write about this topic while it's a little after 2am, but I know a lot of people struggle with falling asleep and staying asleep. Since I started working 3rd shift over two years ago, I have had trouble sleeping on my nights off.
I waited to say anything to my doctor because I was afraid she would immediately put me on a prescription drug. Prescription drugs are useful in many situations, but I was hoping there would be a simpler answer.
 |
| Credit: Free photos from acobox.com |
Melatonin is a hormone that is naturally produced in your body, that helps you fall asleep. According to Melatonin FAQ, the pineal gland begins producing melatonin when it the body is exposed to darkness, and the production peaks around 2-4am.
Taking melatonin supplements has been found to help people that cannot sleep due to shift work or simply because their biological clock is not working as it should.
The recommended beginning dosage is about 1mg, although you may need to increase the dosage. In my personal experience, I have had to gradually increase my dosage from about 1mg to around 6mg to stay asleep through the night, over the course of about 6 months.
If you are having trouble falling asleep and staying asleep, talk to your doctor about this possible prescription alternative.
(It normally works too, I just have to remember to take it before bedtime, unlike tonight... ;)
Sources:
http://www.melatoninfaq.com/
http://www.sleepfoundation.org/article/sleep-topics/melatonin-and-sleep
The information provided here is for informational purposes only. Always consult your doctor before starting any new supplement.
Friday, November 4, 2011
Chocolate Covered Coffee Beans
Since I have already exposed myself as a hardcore coffee drinker, here is another one of my weaknesses...
Chocolate Covered Coffee Beans

These things are AMAZING. I first had some when my parents brought a baggie home from their vacation. I was extremely hesitant. Who wants to eat a bitter, roasted coffee bean? Well was I in for a surprise! They are now probably my favorite piece of chocolate.
The only problem is, they are very pricey. Which means I have only had a handful since I discovered the wonderful combination. Until this week.
For some reason, it had never crossed my mind to make my own, until my sister made me try a spoonful of coffee grounds and chocolate chips. (crazy, I know, but I had my eyes closed) Then it was like a light bulb went off above my head! Why not make my own?!? Honestly, the grounds and chocolate chips tasted just like what we bought at the store. (ok, may not that good, but close enough) Sooo, I set to work with a bag of dark chocolate chips and a bag of hazelnut flavored coffee beans.
To make your own you need your favorite type of chocolate and whole coffee beans. This time, I used dark chocolate, but I would like to try milk chocolate the next time I make them.
Some people like to roast the coffee beans before coating them. Personally, I just used them right out of the bag. I like the crunchiness of them and the texture. If you want to roast them first, put them in a preheated oven at 350F for 8-10 minutes.
First of all, you need a double boiler or a saucepan and a glass bowl to melt the chocolate in. Once the chocolate is melted, add the coffee beans. Mix them around until they are thoroughly coated with chocolate. Other directions say to use a slotted spoon to let the excess chocolate to drip off. But... we're newlyweds and our kitchen isn't completely stocked with utensils yet. So, I used plastic knives to pick them out of the bowl. It works either way!
If they have an excessive amount of chocolate on them still, (not a bad thing, especially if you're not particularly fond of the coffee beans) try to get them into the freezer as soon as possible to prevent the chocolate from melting into a puddle around the bean.
And there you have it! Homemade Chocolate Covered Coffee Beans, at a fraction of the cost. I have a feeling these will make great homemade gifts for those that are crazy about coffee, combined with a cute coffee mug!
Chocolate Covered Coffee Beans
These things are AMAZING. I first had some when my parents brought a baggie home from their vacation. I was extremely hesitant. Who wants to eat a bitter, roasted coffee bean? Well was I in for a surprise! They are now probably my favorite piece of chocolate.
The only problem is, they are very pricey. Which means I have only had a handful since I discovered the wonderful combination. Until this week.
For some reason, it had never crossed my mind to make my own, until my sister made me try a spoonful of coffee grounds and chocolate chips. (crazy, I know, but I had my eyes closed) Then it was like a light bulb went off above my head! Why not make my own?!? Honestly, the grounds and chocolate chips tasted just like what we bought at the store. (ok, may not that good, but close enough) Sooo, I set to work with a bag of dark chocolate chips and a bag of hazelnut flavored coffee beans.
To make your own you need your favorite type of chocolate and whole coffee beans. This time, I used dark chocolate, but I would like to try milk chocolate the next time I make them.
Some people like to roast the coffee beans before coating them. Personally, I just used them right out of the bag. I like the crunchiness of them and the texture. If you want to roast them first, put them in a preheated oven at 350F for 8-10 minutes.
First of all, you need a double boiler or a saucepan and a glass bowl to melt the chocolate in. Once the chocolate is melted, add the coffee beans. Mix them around until they are thoroughly coated with chocolate. Other directions say to use a slotted spoon to let the excess chocolate to drip off. But... we're newlyweds and our kitchen isn't completely stocked with utensils yet. So, I used plastic knives to pick them out of the bowl. It works either way!
If they have an excessive amount of chocolate on them still, (not a bad thing, especially if you're not particularly fond of the coffee beans) try to get them into the freezer as soon as possible to prevent the chocolate from melting into a puddle around the bean.
And there you have it! Homemade Chocolate Covered Coffee Beans, at a fraction of the cost. I have a feeling these will make great homemade gifts for those that are crazy about coffee, combined with a cute coffee mug!
Tuesday, November 1, 2011
November Preparedness Challenge
Getting Started
Being prepared for emergencies and potential power outages is an essential part of living a self-sufficient lifestyle. Depending on where you live, you may face tornadoes, snowstorms, hurricanes, wildfires or earthquakes. The sudden snowstorm earlier this week is a perfect example. Millions of people have been out of power and many still are. How you handle these situations will depend on how well you have prepared for them.
So, where do you begin? Here is a quick primer on where to start.
· Step One - Start with a emergency plan. Where is your family to meet if your house catches fire? Make sure everyone in the family knows where they should go. It should be easy enough to get to, like a tree in the front yard.
· Step Two – Have “Emergency Bags” ready for every member of the family. An Emergency Bag is a backpack or bag with the necessities needed to survive for 3 days. These should contain complete changes of clothes, shoes, personal information and identification, medications, and food. By having a bag ready to go, this frees up critical time that you may not have in the event of a natural disaster. I keep one for my husband and me, ready to go by our bed in case of a tornado. Because we live in a mobile home, it is very important that we are able to get out to a safe place as fast as possible. FEMA has a good page on what to include in an emergency bag here.
· Step Three – Water, no one can live without it. Three days without it, and you’re done for. Make sure you have a minimum of one gallon of water per person, per day for at least three days stored in your home. One gallon per person should be enough for drinking and cooking.
Step Four - Many people live day to day regarding having food in their home. Have you ever seen a grocery store right before a snowstorm or hurricane? All of the necessities are wiped out, and may not arrive for weeks, depending on the seriousness of the situation. Make sure you and your family can live at least two week on the food in your home. You don't have to go out and buy the latest and greatest food supplies advertised on television.
When you are out grocery shopping, instead of buying one bag of beans, buy two. Then, when you use one of what you bought, you still have one left in the pantry. This way, you can slowly you will start to build up your food storage. Also, be sure that you have food that can be prepared without modern conveniences, such as the microwave or even electricity.
When you are out grocery shopping, instead of buying one bag of beans, buy two. Then, when you use one of what you bought, you still have one left in the pantry. This way, you can slowly you will start to build up your food storage. Also, be sure that you have food that can be prepared without modern conveniences, such as the microwave or even electricity.
This is just a brief overview of the many aspects of being prepared for emergencies. I hope to go into more depth on different topics in future Preparedness Challenge posts, so keep reading! The FEMA website has a lot of good information that goes into further detail.

Monday, October 31, 2011
Colors of Fall
I LOVE fall. It is by far my favorite season. I love the crisp leaves, crunching under your feet and the smell of the leaves as you rake them into a huge pile. But most of all, I love the beautiful color of the leaves before they fall! So,my husband and I decided to take the 3-wheeler out on the back roads yesterday as the sun was setting to get some good pictures of the fall colors. Here is what we saw :)


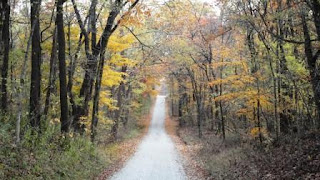


 Hope you enjoyed the pictures!


Friday, October 28, 2011
Bruschetta with Tomato and Basil
Last night for dinner, I turned a tomato, french bread, olive oil, mozzarella, and basil pesto into a delicious plate full of Italian goodness! Although it is normally thought of as an appetizer, we find that after two slices we are stuffed! With just a few ingredients you can have a delicious meal, that is pretty good for you too. Here's my recipe for one of my favorite quick meals :)


Bruschetta with Tomato and Basil
Fresh tomato, diced
Italian bread, sliced
Basil pesto
mozzarella cheese
olive oil or butter
First, mix a tablespoon of basil pesto in with either 4T of melted butter or olive oil. Spread over the french bread slices. Toast in toaster oven until golden brown. Top with slices of mozzarella cheese (slices work best, but all I had was shredded) and diced tomatoes. Toast again until cheese is melted and tomatoes are hot.
You can also serve it with cold tomatoes on top (that's how I like it).
 |
| Sliced French Bread |
 |
| Slathered with olive oil and basil pesto |
 |
| Toasted and topped with cheese |
 |
| And of course, tomatoes! |
Wednesday, October 26, 2011
Pumpkin Pie Coffee Creamer
I am a coffee addict. I admit it. In an average week, I go through about two 32 oz bottles of store-bought liquid creamer. I switch the flavors around. One week I have Almond Joy and Cinnabon, the next it may be White Chocolate and Raspberry. Sometimes I'll go back to the plain 'ol hazlenut or french vanilla, but most of the time I experiment with new flavors. Now, in my defense, staying up until 7am isn't the easiest without a caffeine boost, and hey, why not make it tasty in the process, right?
Well, the other day I was blog surfing (don't know if it's an actual term, but it works) and I came across a recipe for Pumpkin Pie Coffee Creamer at Homemaking on the Homestead! (Lots of good pumpkin recipes there too!) I have been scouring the local stores for this with no luck, for the last month! So, I gathered the ingredients and made some this afternoon. I wasn't quite sure how it would turn out, so I only made one batch at first. After testing it out with my cappuccino maker (makes some AWESOME froth!) it was a hit! I went ahead and made creamer out of the whole 32 oz of half & half that I bought. I'll easily go through it all in the 7-10 day lifespan, especially after sharing my success with my co-workers!
After realizing how awesome this creamer was, I started to wonder what else am I missing out in the world of homemade creamers? Really, if I can make it at home with REAL ingredients I'd much rather do that than look at the list on the store bought bottle and have no idea what's even in it! So I googled it! I now have an entire list of homemade creamers, that sound awesome! And I will share them with you as I try them out at home :)
So, here is the first one...
Pumpkin Pie Coffee Creamer
·
1 cup half-n-half
·
½ cup cane juice crystals (can use
white sugar instead)
·
3T canned pumpkin
·
½ t vanilla
·
½ t cinnamon
·
¼ t ginger
·
1/8 t nutmeg
·
1/8 t cloves
Combine all ingredients in a small
sauce pan. Heat until cane juice crystals or sugar is dissolved and ingredients are
well combined. Enjoy in a hot cup of coffee. Store in refrigerator for 7-10 days.

Do you have anything that you can make better at home than store-bought? Share it! I'd love to hear about it in the comment section below :)
Tuesday, October 25, 2011
BBQ Chili Pasta
Since I work third shift and my husband works first shift, there is very little time between him getting home and me leaving for work. So, it's always great to find a quick meal that is quick, a little different and changes things up. Well he found this recipe on his allrecipes.com app on his phone and has been wanting to try it. Sunday night, before I left for work he made BBQ Chili Pasta.
Now to be honest, I was a little nervous because of the name. I mean, really BBQ and chili?? Really? Well I was in for a shock. I really enjoyed it! It was pretty quick, and if you had pre-frozen ground turkey or beef, it would be even faster. We used whole wheat rotini to make it a little healthier. My favorite part was the fresh green peppers, I think that made the dish.
Since this serves 6 we had plenty left over for meals for work too!

Nutritional Information
This is taken from the allrecipes.com website, http://allrecipes.com/Recipe/bbq-chili-pasta/detail.aspx
Now to be honest, I was a little nervous because of the name. I mean, really BBQ and chili?? Really? Well I was in for a shock. I really enjoyed it! It was pretty quick, and if you had pre-frozen ground turkey or beef, it would be even faster. We used whole wheat rotini to make it a little healthier. My favorite part was the fresh green peppers, I think that made the dish.
Since this serves 6 we had plenty left over for meals for work too!
BBQ Chili Pasta
Ingredients
- 1 (8 ounce) package rotini pasta
- 1 tablespoon olive oil
- 1 onion, chopped
- 8 ounces ground turkey
- 1 green bell pepper, chopped
- 1 (15 ounce) can whole kernel corn, drained
- 1 tablespoon chili powder
- 1 tablespoon dried oregano
- 1/2 teaspoon salt
- 1 (8 ounce) can tomato sauce
- 3/4 cup barbecue sauce
Directions
- In a large pot with boiling salted water cook rotelle pasta until al dente. Drain.
- Meanwhile, in a large non-stick skillet heat oil over medium-high heat, add onion and cook until onion for 2 minutes, or until softened. Add ground turkey and cook until no pink remains, about 3 to 4 minutes. Stir in chopped green bell pepper, corn, chili powder, dried oregano, salt, tomato sauce, and BBQ sauce. Bring mixture to a boil. Reduce heat to medium and simmer until slightly thickened, about 3 to 4 minutes, stirring occasionally.
- In a large serving bowl, combine the turkey mixture with the pasta. Serve immediately.
Nutritional Information

Amount Per Serving Calories:
340
| Total Fat:
7.4g
| Cholesterol:
29mg
Powered by ESHA Nutrient Database
Your turn! Do you have any quick, easy meals you always turn to when everyone's hungry? I'd love to hear it!
Thursday, October 20, 2011
Parke County Covered Bridge Festival
 |
| Neet Bridge |
Every autumn, the leaves begin to change color and fall to the ground. I start to think about the all of the bonfires that we will gather around with our friends, along with the hot chocolate, popcorn balls and candied apples.
I also start planning our annual trip to the Parke County Covered Bridge Festival. Every year, thousands of people travel to central Indiana for this county-wide event. The county is full of beautiful historical covered bridges, surrounded by natures beautiful changing leaves. If you follow the routes marked with colored arrows, you can travel the countryside to see the breathtaking views of beautiful covered bridges.
This year, it was a chilly 35 degrees outside, along with a light mist. We even saw the occasional flurry while we were out about walking through the towns!
This year, it was a chilly 35 degrees outside, along with a light mist. We even saw the occasional flurry while we were out about walking through the towns!
 |
| The Mansfield Bridge |
 |
| Persimmon Pudding |
In addition to the beautiful sites and yummy food, there are PLENTY of vendors. I normally don’t buy very much, but I really enjoy walking through the little towns to get a glimpse of what the local vendors have to offer. Chainsaw crafted sculptures, homemade crafts, etc. If you are ever in Central Indiana in October, be sure to check out the Covered Bridge Festival!
Do you have a favorite local event that you enjoy attending every year? Let me know about it in the comment section below! :)
Check out the Fall Harvest Blog Hop!
 |
| The Bridgeton Bridge (2009) |
Do you have a favorite local event that you enjoy attending every year? Let me know about it in the comment section below! :)
Check out the Fall Harvest Blog Hop!
Tuesday, October 18, 2011
Natural Dyes
After my post on harvesting black walnuts, I decided to look around and see if we had any pecans. My husband and I found a few big pecan trees down the road and brought back a bag full. Now this is where the dyes come in...
Yes, I know I've read over and over to wear gloves while taking the hulls off nuts... Somehow it slipped my mind while I was hulling the pecans while reading my Managerial Finance textbook. (I'm trying to improve my multitasking skills!) So as you can imagine, my fingers and fingernails are stained a beautiful dark brown color! So, this is my disclaimer to the previous blog post, wear old gloves!
Honestly, yes it's unsightly and it will take several weeks for it to go away, but it's a lesson learned. It did get me to thinking though, about all of the great sources of natural dyes we have just laying around. Pokeweed berries (they are poisonous though, don't eat them) make a beautiful purple dye. As a kid, my sister and I would fill up quart jars of them and make dyes to draw with. We'd also draw on each other with the dyes and pretend we were Indians. I'm sure Mom appreciated that!
I got to looking around on the internet and found this neat website I thought I would share. It goes over what plants to use for certain colors, how to make the dyes, and color fixatives. It's a lot more information than I can go over in one blog post, so here's the website: Natural Dyes.
Has anyone ever used natural dyes themselves? What are your experiences? Let me know in the comments below!
Yes, I know I've read over and over to wear gloves while taking the hulls off nuts... Somehow it slipped my mind while I was hulling the pecans while reading my Managerial Finance textbook. (I'm trying to improve my multitasking skills!) So as you can imagine, my fingers and fingernails are stained a beautiful dark brown color! So, this is my disclaimer to the previous blog post, wear old gloves!
Honestly, yes it's unsightly and it will take several weeks for it to go away, but it's a lesson learned. It did get me to thinking though, about all of the great sources of natural dyes we have just laying around. Pokeweed berries (they are poisonous though, don't eat them) make a beautiful purple dye. As a kid, my sister and I would fill up quart jars of them and make dyes to draw with. We'd also draw on each other with the dyes and pretend we were Indians. I'm sure Mom appreciated that!
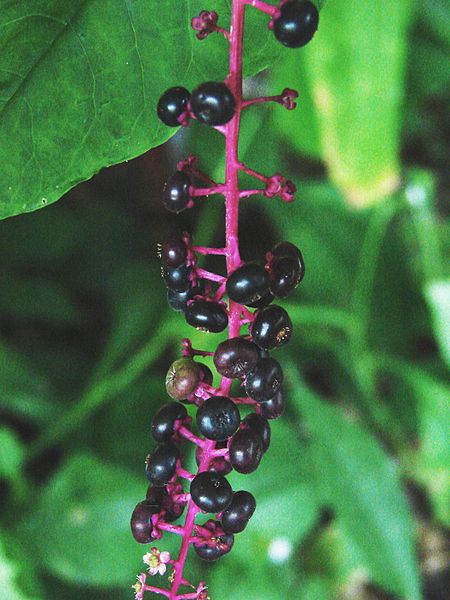 |
| Pokeberries |
Has anyone ever used natural dyes themselves? What are your experiences? Let me know in the comments below!
Saturday, October 15, 2011
Black Walnut Harvest
This afternoon, we were cleaning up some trees that fell down in the horse pasture awhile back. As I was walking down by the creek I stumbled upon some black walnuts! So, I grabbed a bucket and my little brother and we set to work. We ended up collecting a couple five gallon buckets worth of nuts.
To get the hulls off the shells, I poured them into the gravel driveway. Leaving them in the there for a bit allows our vehicles to get the hulls off of the nuts. There are other methods of doing this, but I this seems to be the least time consuming way.
After the hulls are removed and picked up out of the driveway, you can determine if you have any "floaters" by putting them in a container full of water. The floaters are nuts that are normally not fully developed inside and do not have very much nutmeat. Before you throw them out check them and make sure though, sometimes they simply have a thin shell.
Now they will need to be stored where they can cure properly. Many people keep them in old feed sacks so they can get plenty of air circulation. They need to cure for about eight weeks or so. After curing they are ready to crack and eat! As you can see it will be a couple months before we will be able to actually use them. Compared to the retail price of black walnuts though, you can't beat harvesting your own!
To get the hulls off the shells, I poured them into the gravel driveway. Leaving them in the there for a bit allows our vehicles to get the hulls off of the nuts. There are other methods of doing this, but I this seems to be the least time consuming way.
 |
| Black Walnuts |
 | |
| My brother, Josiah |
Now they will need to be stored where they can cure properly. Many people keep them in old feed sacks so they can get plenty of air circulation. They need to cure for about eight weeks or so. After curing they are ready to crack and eat! As you can see it will be a couple months before we will be able to actually use them. Compared to the retail price of black walnuts though, you can't beat harvesting your own!
Friday, October 14, 2011
Now on Facebook!
The Modern Homestead is now on Facebook! You can "like" the blog at The Modern Homestead Facebook Page. Hope to see you there! :)
Thursday, October 13, 2011
Spinach and Cabbage Minestrone Soup
I love making soups. What I like doing even more than making soup, is making my OWN recipe for it! Well, yesterday I had a recipe DH wanted me to try out. I got a little distracted and made it my own ;) It ended up turning out pretty good though. DH really liked it and so did I. Since it was, "a little of this, and a little of that" the recipe isn't exact, but you can figure it out!
Spinach and Cabbage Minestrone Soup
6 cups beef broth (I didn't have any on hand so I used more seasonings and water)
1 lb ground beef
2 small onions, quartered and sliced
1 clove garlic, minced
1 can diced tomatoes
1 cup shredded cabbage
1 cup spinach
1 can kidney beans
1 cup cooked macaroni noodles
1/2 cup sliced carrots
Italian seasoning to taste
Onion powder to taste
Garlic salt to taste
In a pot, brown the ground beef until cooked. Drain grease. Add onions, garlic, carrots, and cabbage. Saute until onions are translucent. Add the broth, tomatoes, kidney beans, and spinach. Add seasonings to taste. Let simmer. About 30 min before serving, add the macaroni. Remember, it's not exact so experiment and make it your own :) Enjoy!

Tuesday, October 11, 2011
Homemade Vanilla Extract
Earlier this year I made homemade vanilla extract. I couldn't believe how easy it was, and how much cheaper it is to make than to buy it at the store! All you need are a couple ingredients and some bottles to store it in. It also makes an excellent gift!


Homemade Vanilla Extract
2 cups vodka, rum or brandy
6 vanilla beans
Cut the vanilla beans longways all the way up until about 1" before the end. You don't want to cut the entire bean because it will fall apart. In tall bottles, put 2-3 beans in and fill to the top with your choice of liqueur. Let sit for about 2 months for the vanilla to infuse into the alcohol. Since you leave the vanilla beans in the bottle, when your bottles get low just refill with more alcohol. Some people like to strain it before use, but personally I like the little specks of bean that is left in it.
Finding the Vanilla Beans
E-Bay is a great place to find food-grade vanilla beans. I got mine from this this seller on ebay and had no problems. Sometimes small specialty stores have vanilla beans for sale locally, too. It just takes some searching.

Do you have something you like to make homemade instead of buying? Let me know in the comment section! I'd love to hear your ideas!
Saturday, October 8, 2011
Choices, Choices...
After some research yesterday on different apple tree varieties, I believe I have narrowed it down. I narrowed it down to Enterprise, Jonafree, and Granny Smith apples because of their hardiness in my area and their strong disease resistance. The less chemicals I have to put on the trees the better for everyone!
I am also looking at some cherry trees, persimmon and*possibly* some peach trees. I LOVE peaches, and it would be great to have them straight from the farm! We didn't have great luck with them at our last place though, so I am a bit hesitant to spend the money on them.
After measuring the area we have set aside for the orchard, I found I have room for about 10 trees. At our house, apple trees would be the most used so they will make up the majority of the trees planted. They are great for homemade applesauce (the best!), home canned apple pie filling, and fresh pressed apple cider! I may decide to put the cherry trees in other places, just so I have more room for apple trees.
Leave me a comment with your favorite apple use and why! Recipes are always welcome :)
Friday, October 7, 2011
First Blog Post!
First Post
This is the first post, in what I honestly hope will be a long lived blog. I really enjoy writing, especially to straighten out my thoughts. It helps for some reason. It may be because I am a visual learner and things just make more since once I see them on paper (or the computer screen). I also hope this blog will be a help to others looking for information and encouragement in their homestead endeavors. So here it is...
Apple Trees
So, after being on this farm for six years now, I believe I have finally convinced my father into planting some apple trees. You see, at our last place we had a HUGE orchard. OK, so maybe it wasn't that big, but for a total of three acres it was large. We had around 15 apple trees there and it sort of overwhelmed us there. They were also standard sized trees, so pruning took a lot of time.
This time we have to plant our own. That means research! I do know that we want to plant semi-dwarf trees this time. They are shorter than standard-size trees, therefore easier to prune and take care of. They are more suited to a small homestead.
I have found a reputable dealer online (recommended from several people), and now I am researching apple tree cultivars that are suitable for my state. An indispensable site for things such as this has been Purdue Extension publications. Here you can find information galore! So, for a project such as this I found a list of apple cultivars for Indiana.
Subscribe to:
Posts (Atom)